StopWatch for HubSpot |
Usage Guide 📝
This guide aims to help you get up and running with StopWatch for HubSpot, an intuitive time tracking app designed to exist entirely within HubSpot. If reading this guide doesn't help to solve a particular issue you're experiencing, please submit a support request.
Quick Links
1. Installing StopWatch for HubSpot
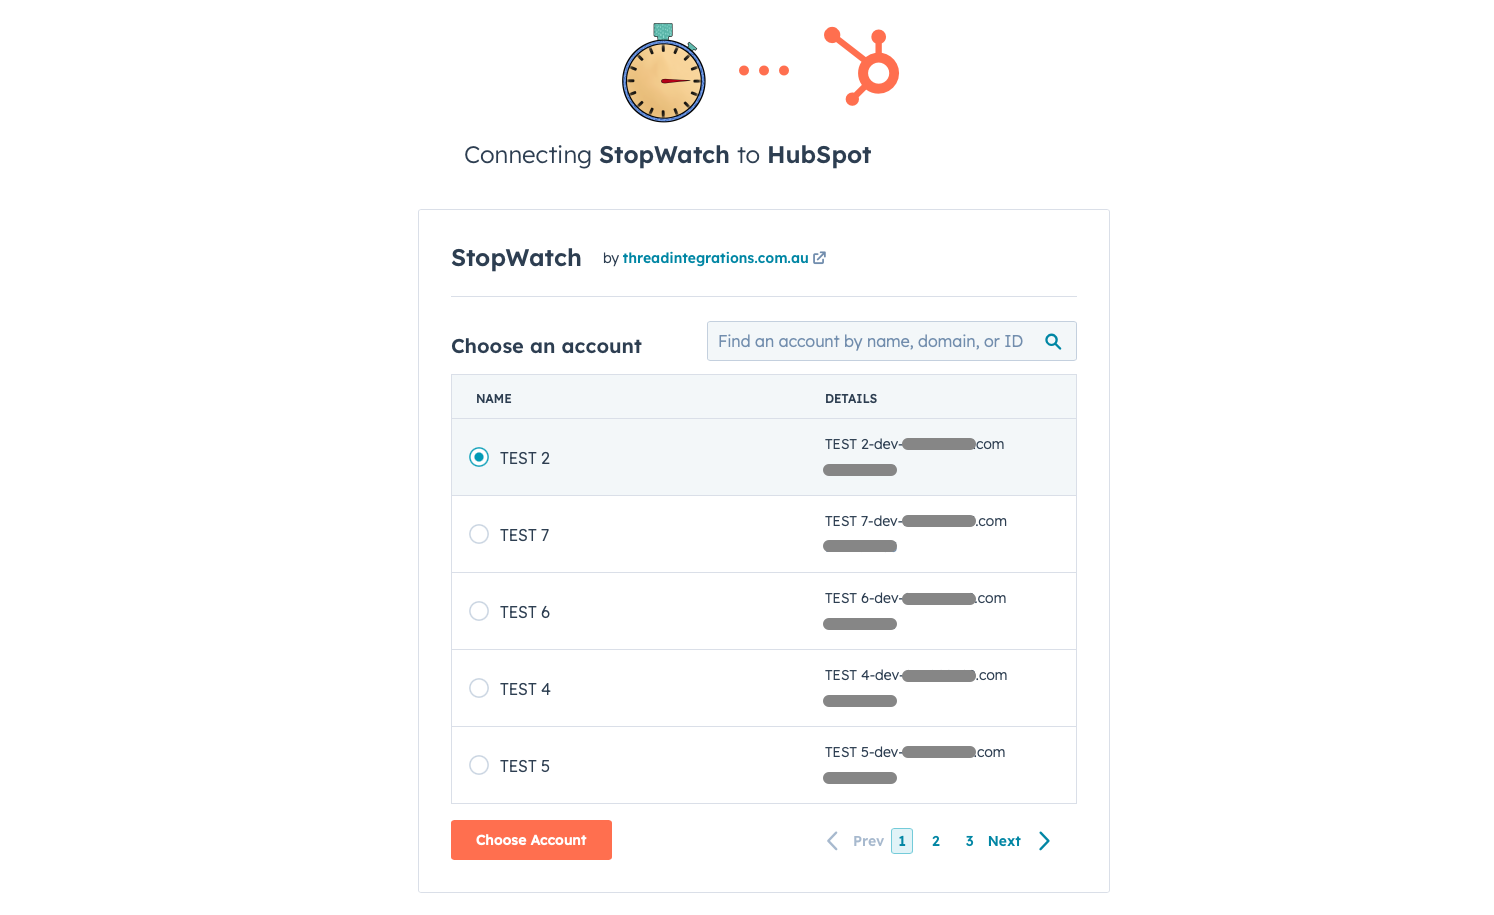
Before you can start using StopWatch for HubSpot, you must successfully install the app within your HubSpot account. To use StopWatch for HubSpot, your HubSpot account must have access to Custom Objects ↗️. Installation will fail if you do not have access to HubSpot Custom Objects. You can initiate the installation process by clicking on the button immediately below (which is also accessible via the homepage).
After the installation process is complete, hopefully you will see an installation success message. If you see an error message, please wait a couple of minutes before trying again. If you see an error message again, please submit a support request. For reference, we've included some screenshots of the installation process below.
NOTE: As part of the installation process, HubSpot will ask you to confirm within which account/portal you'd like to install the StopWatch for HubSpot app. You'll then be prompted to allow StopWatch for HubSpot access to certain information and permissions relating to the selected HubSpot account. We only request access and permissions necessary to deliver our services. If you'd like to discuss why we need certain access or permissions, please get in touch via email: zach@threadintegrations.com.au
App Installation Process Screenshots

 Back to top of page
2. StopWatch Subscriptions & Nominating Users
Once you've successfully installed StopWatch for HubSpot within your HubSpot account, you'll need to choose and confirm your StopWatch for HubSpot subscription plan, and then nominate your users.
You can compare all available subscription plans on the homepage. The "🤗 Free" subscription plan is limited to a certain number of unique users (identified by exactly the same email address they use to access their HubSpot account).
Once you choose a subscription plan, you'll need to confirm with payment via our third-party payment provider, Stripe (links for each plan are available on the homepage, multiple currency options available).
If you've chosen the "🤗 Free" plan, all you'll need to do to confirm your subscription is nominate your users. To successfully allow access for your StopWatch for HubSpot users, you must nominate exactly the same email address(es) your nominee(s) use to access their HubSpot accounts (visible within the "Users & Teams" section of your HubSpot settings).
Please note, there will be no chance to change or rotate users at a later date. If you need other members of your team to use the app after having already nominated your users, you'll need to upgrade to a paid subscription plan.
The "💫 Unlimited" and "👥 Team" plans include an unlimited number of users. As such, there's no need to do anything else after you've confirmed payment.
NOTE: If you fail to nominate your users after having successfully installed the app, the StopWatch feature will not be made available within your HubSpot account.
Back to top of page3. Using the StopWatch ⏱️
The StopWatch for HubSpot experience, and the quality of the data made available by the app, relies heavily on your interaction with the "StopWatch".
⚠️ IMPORTANT: We recommend tracking time via the StopWatch and/or our Custom Workflow Actions only. We do not recommend creating or updating "Time Log" records manually or by any means other than interacting with the StopWatch for HubSpot App.
There have been 2 versions of the StopWatch:
- 1. CRM App Card (powered by HubSpot's "UI Extensions" feature), referred to as "StopWatch"
- 2. CRM Custom Card [Sunsetted 31 October 2024] (powered by HubSpot's "CRM Extensions" feature), referred to as "StopWatch (Legacy)"
The CRM App Card version is hidden by default. It must be manually added to the right sidebar on individual record views. For example, to add the CRM App Card version of StopWatch to your Contact right sidebar view:
Navigate to HubSpot Settings > Objects > Contacts > Record Customization > Customize the right sidebar > Select the relevant view (e.g. "Default view") > Add card > "StopWatch" > Reposition the view's cards as required
The StopWatch App Card is available for the following HubSpot CRM Object Types:
CONTACT, COMPANY, DEAL, TICKET, APPOINTMENT, COURSE, LISTING, SERVICE
Upon request, with some custom development work, the StopWatch App Card can be made available on HubSpot Custom Object views. If you'd like to learn more about using the StopWatch App Card with custom objects, please feel free to make a request via our support form.
☝️ Remember, in order to use the CRM App Card StopWatch version, you'll need to manually add this to the individual record view for each relevant object type.
StopWatch - CRM App Card
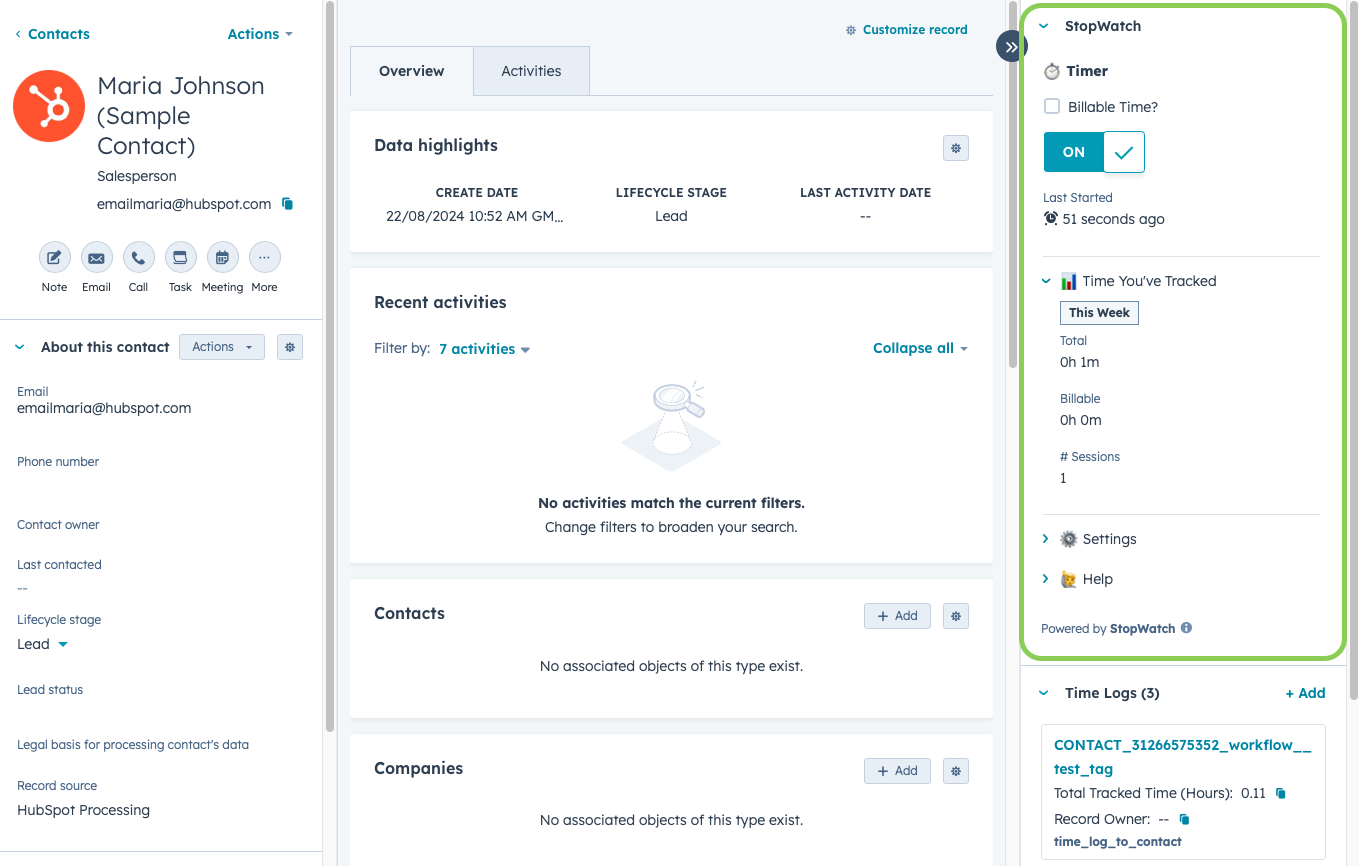
To track time against the record you are viewing (when using the CRM App Card StopWatch version), use the "⏱️ Timer" toggle visible at the top of the StopWatch element. The "📊 Time You've Tracked" section should automatically refresh each time the timer is stopped.
StopWatch Summary Data
The StopWatch element displays information relevant to the record you are viewing. This information may include:
| Label | Type | Explanation |
|---|---|---|
| Billable Time? | Checkbox | [Only visible if 'Billable Time Option' setting is enabled for the given
user] Whether or not the time being tracked is to be considered 'Billable'. Considered only when you stop the Timer. Each time tracking session can only be entirely 'Billable' or entirely 'Non-Billable' (i.e. it's not possible to split individual time tracking sessions between 'Billable' and 'Non-Billable' time). Billable tracked time data is stored on dedicated Time Log properties. |
| ⏱️ Timer | Toggle [ON or OFF] |
Whether or not the StopWatch is currently "running" for the given user. |
| Last Started | Duration | The duration of time the Timer has been "ON" for. This should automatically update approximately every 5 seconds for the App Card version of the StopWatch. |
| Total (Tracked Time) | Duration | Total time duration already tracked against the record by the given user (expressed as hours and minutes). |
| Billable (Tracked Time) | Duration | [Only visible if 'Billable Time Option' setting is enabled for the given
user] Billable time duration already tracked against the record by the given user (expressed as hours and minutes). |
| Number of Sessions | Number | How many time tracking sessions have been recorded for the record by the given user. A session is counted each time a user "stops" the StopWatch. |
| Auto Start Enabled? | Boolean [TRUE or FALSE] |
Whether or not the "Auto Start Timer" app setting is enabled for the given user. This is a user-specific app setting that can be managed by HubSpot users with "App Marketplace Access" permissions. See the "App Settings" section of this page for more information. |
| Split By Week? | Boolean [TRUE or FALSE] |
Whether or not the "Split Time Logs By Week" app setting is enabled for the given user. This is a user-specific app setting that can be managed by HubSpot users with "App Marketplace Access" permissions. See the "App Settings" section of this page for more information. |
| Split By Month? | Boolean [TRUE or FALSE] |
Whether or not the "Split Time Logs By Month" app setting is enabled for the given user. This is a user-specific app setting that can be managed by HubSpot users with "App Marketplace Access" permissions. See the "App Settings" section of this page for more information. |
| Billable Time Option | Boolean [TRUE or FALSE] |
Whether or not the "Billable Time Option" app setting is enabled for the given user. This is a user-specific app setting that can be managed by HubSpot users with "App Marketplace Access" permissions. See the "App Settings" section of this page for more information. |
| Round Up To Nearest | Dropdown Select [Disabled, 5 mins, 6 mins, 15 mins, 30 mins, 60 mins] |
The option currently configured for the "Round Up To Nearest" app setting. This is a user-specific app setting that can be managed by HubSpot users with "App Marketplace Access" permissions. See the "App Settings" section of this page for more information. |
| Quick Add Session Increments | Dropdown Select [Default, 6 mins] |
The option currently configured for the "Quick Add Session Increments" app setting. This is a user-specific app setting that can be managed by HubSpot users with "App Marketplace Access" permissions. See the "App Settings" section of this page for more information. |
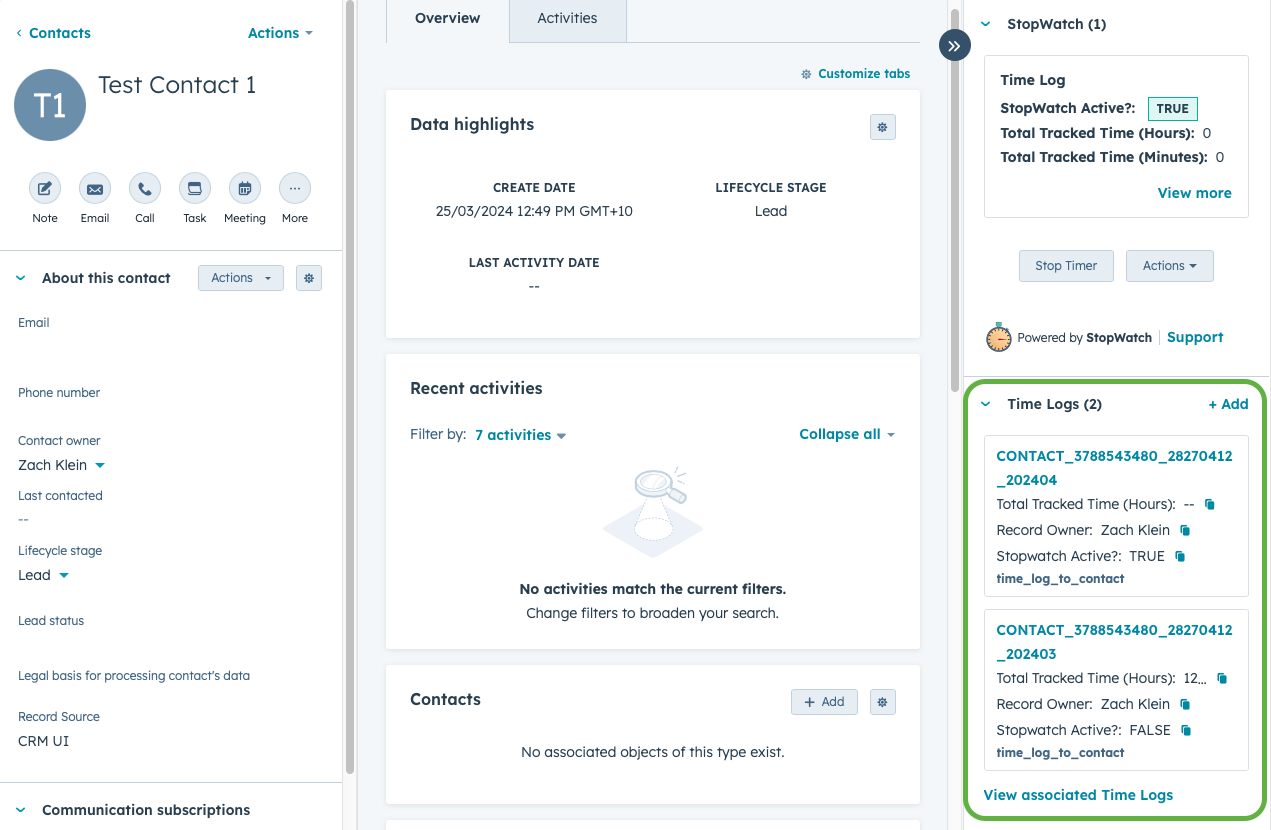
When you use the StopWatch to track time against a HubSpot record, the StopWatch for HubSpot app creates/updates a "Time Log" record (custom object type) and associates it with the record you are tracking time against (i.e. an individual Contact, Company, Deal, Ticket, Appointment, Course, Listing or Service). You can view and navigate to your Time Log records using the right sidebar (see image below).
➕ Quick Add
The StopWatch App Card offers the ability to 'Quick Add' a time tracking session. This is intended to be used in the following scenarios:
| Scenario | Detail |
|---|---|
| 1. 'Batch' / 'end-of-day' time tracking method | For customers who prefer or need to be able to input historic time tracking sessions manually, rather than inputting time tracking sessions in real-time via the 'Timer' toggle. |
| 2. Forgotten to track time spent | For customers who may have forgotten to track time via the 'Timer' toggle and need to be able to manually input the forgotten time tracking session. |
To use this feature, simply expand the '➕ Quick Add' section, input all the relevant information relating to the time tracking session you'd like to record and click 'Submit'. If you need more information about any of the form fields, please hover your cursor over the relevant tooltip (ℹ️).
💸 Billable Time
Flagging a time tracking session as "billable" populates a number of Time Log properties that help you keep track of "Billable Tracked Time" vs. "Total Tracked Time".
StopWatch for HubSpot "💫 Unlimited" subscribers also have access to the "Billable Amount" Time Log property, which is automatically populated based on billable rates (per HubSpot User) set by your StopWatch for HubSpot Admin user. This is designed to help you when it comes time to invoicing for "billable" time tracked via the StopWatch App Card.
⚠️ Manually Adjusting Time Logs
As previously mentioned, to decrease the likelihood of time tracking data quality issues for our customers, we do not recommend manually updating Time Log records. However, we understand that in some cases this may be inevitable. If you must adjust the tracked time data stored on an individual Time Log record (for example, if you accidentally left a timer running), this can be achieved by following the steps below.
Please note, [1] these steps would need to be followed by the HubSpot User whose time tracking data is being adjusted and [2] this is only relevant for Time Logs created via the StopWatch CRM Card (i.e. not via our Custom Workflow Actions):
| Step # | Instruction |
|---|---|
| 1 | Navigate to the relevant HubSpot CRM record (e.g. the individual Contact, Company, Deal, Ticket, Appointment, Course, Listing or Service view) |
| 2 | Ensure the StopWatch timer is not running (i.e. if it's running, stop the timer) |
| 3 | Navigate to the relevant Time Log record view |
| 4 | Adjust the Time Log property "Total Tracked Time (Minutes)" to align with your needs |
| 5 | Navigate back to the relevant HubSpot CRM record (from Step 1) |
| 6 | Start the StopWatch timer and wait for the confirmation message |
| 7 | Stop the StopWatch timer |
By initiating a new Time Log "Session", this effectively resets all "Total Tracked Time" property values stored on the given Time Log record, using the "Total Tracked Time (Minutes)" property (which you adjusted in Step 4) as a calculation "anchor". The screen-recording below demonstrates an example where someone has accidentally left a StopWatch timer on for over a week. In the example, the total tracked time data stored on the relevant Time Log is updated 60 minutes. Notice how all other "Total Tracked Time" properties automatically update once the StopWatch timer is started and stopped.
Back to top of page4. Time Logs
As part of the installation process, the StopWatch for HubSpot app creates a custom object type within your HubSpot account, called "Time Logs".
When time is tracked against a HubSpot record (using the StopWatch), information about this tracked time is stored on an associated "Time Log" record. If you use only the StopWatch for creating and managing Time Log records (as recommended), there should exist in your HubSpot account 1 Time Log record per unique combination of the following variables:
[ Object Type | Object/Record ID | HubSpot User ID ]
These variables are used to construct Time Log record titles, for example "CONTACT_51_123456789" (where "CONTACT" is the object type of the record that time is being tracked against, "51" is the relevant Contact record ID and "123456789" is the HubSpot user ID of the person tracking the time).
For any period of time where the optional, user-specific "Split By Week" app setting is enabled, there should exist in your HubSpot account 1 Time Log record per unique combination of the following variables:
[ Object Type | Object/Record ID | HubSpot User ID | Year | Week Number ]
'Split By Week' Time Log titles adhere to the following format: "TICKET_101_987654321_2024_50" (where '2024_50' indicates the time was tracked in the 50th week of 2024).
For any period of time where the optional, user-specific "Split By Month" app setting is enabled, there should exist in your HubSpot account 1 Time Log record per unique combination of the following variables:
[ Object Type | Object/Record ID | HubSpot User ID | Year/Month ]
'Split By Month' Time Log titles adhere to the following format: "TICKET_101_987654321_202404" (where '202404' indicates the time was tracked in April 2024).
Each Time Log record contains aggregated data (within HubSpot "properties"), reflecting a summary of all time tracking sessions relevant to itself. This data is visible in the left sidebar on the Time Log record view (see image below). The display of these properties can be customised within your HubSpot account settings.
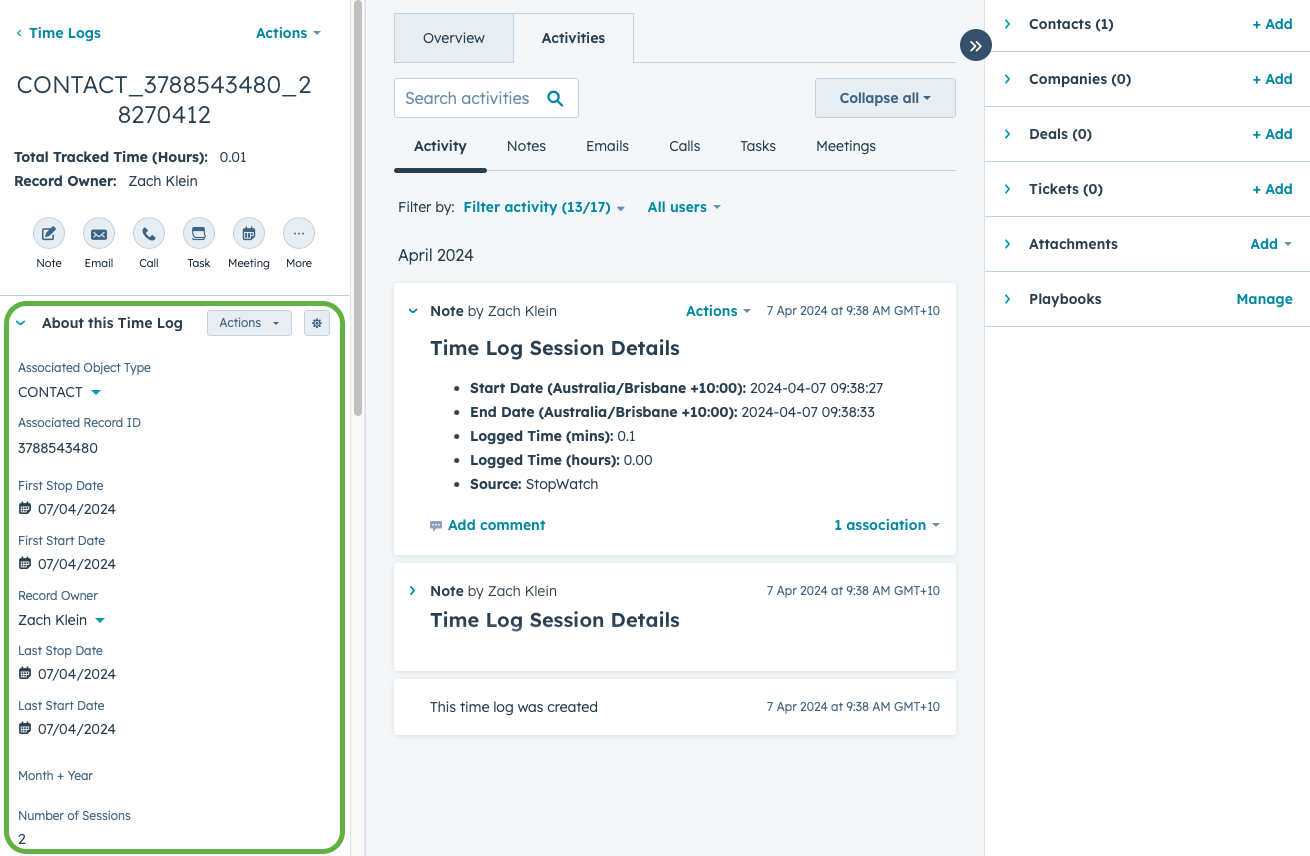
Information relating to each individual "session" of time tracked (using the StopWatch) can be viewed as "Notes" within the activity timeline of the relevant "Time Log" record (see image below).
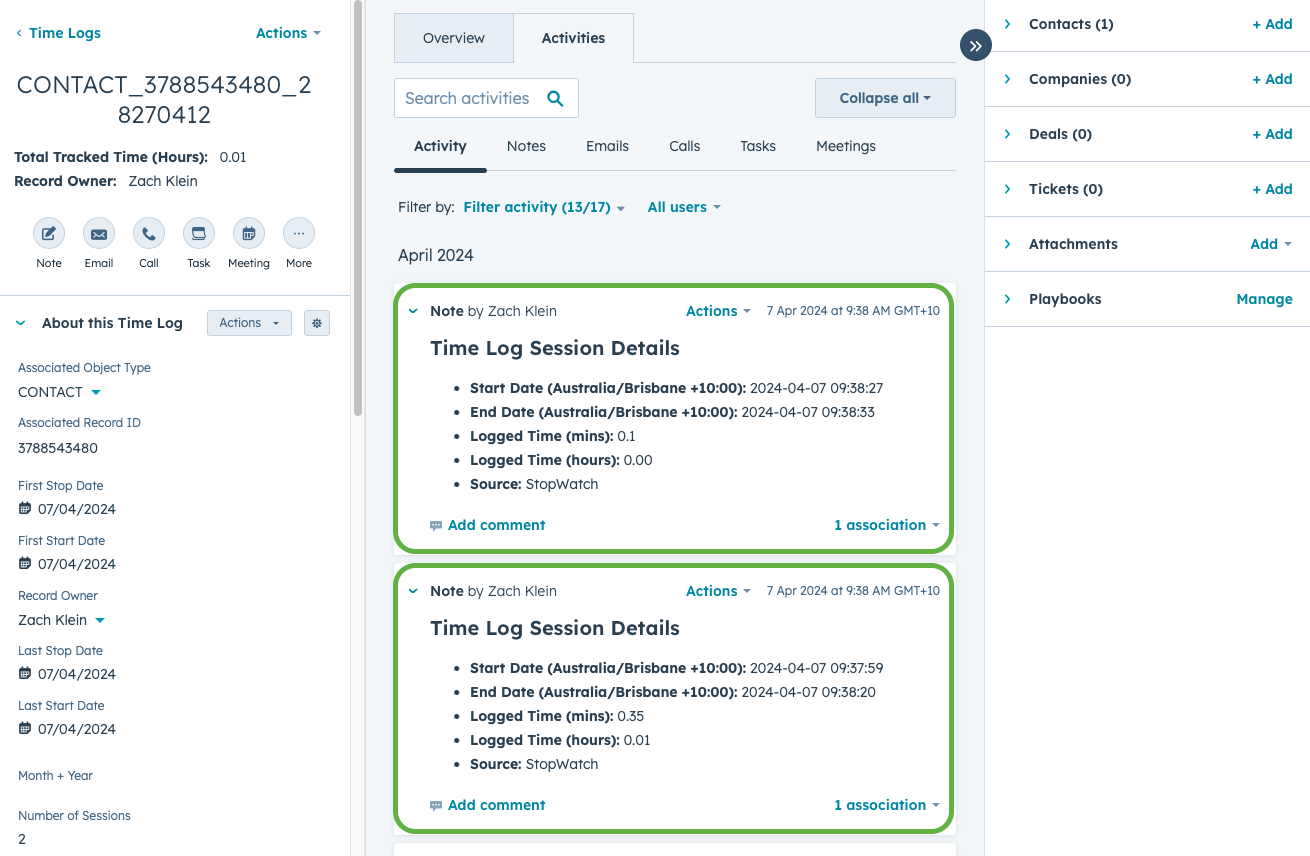
NOTE: For reference, these "Notes" are standard HubSpot Engagement records, of "Note" type. They are automatically generated by StopWatch for HubSpot based on interaction with the StopWatch.
Back to top of page5. Suppressing Time Log Ownership Notifications
Each "Time Log" record created via interaction with the StopWatch is automatically assigned a HubSpot "Owner", reflecting the HubSpot user who is tracking the time.
The inclusion of this feature within StopWatch for HubSpot is designed to allow for more powerful reporting and automation when working with Time Log records (among other benefits, record ownership of Time Logs allows for [1] dynamic filtering within reports, and [2] subsequent record ownership assignment within workflows).
By default, if a record of any object type (including custom objects) is assigned an Owner, the relevant HubSpot user is sent an email notification, alerting them to their ownership of the record.
This email notification (which is enabled by default) can be managed by users within HubSpot's settings:
Settings > Notifications > Email > Custom Objects > "Custom object assigned to you"
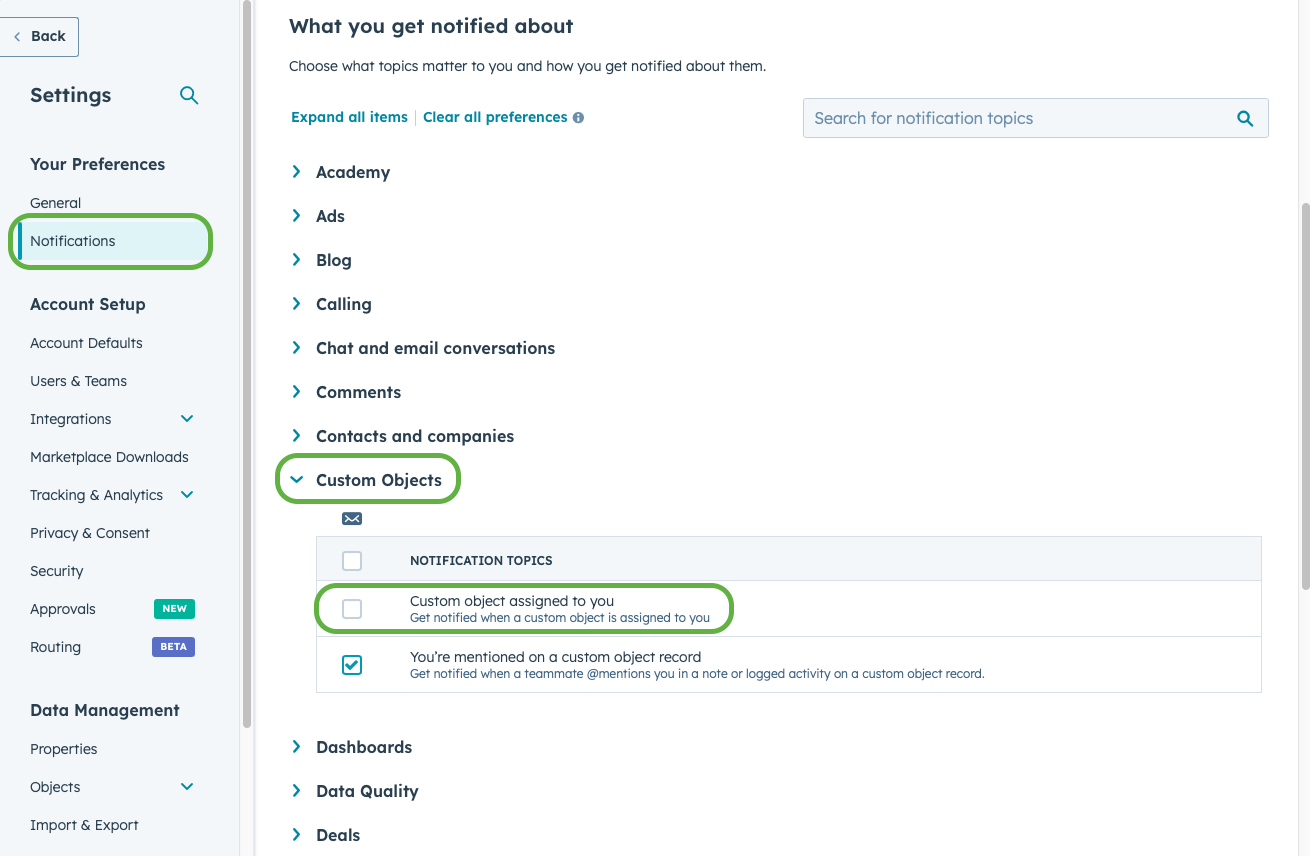
Unfortunately, this notification can only be managed collectively across all custom objects within a HubSpot account (i.e. it's not possible to manage this notification granularly, per custom object type). Rather than turning them off in HubSpot, alternatively you could consider configuring your email inbox filters / settings to more selectively "hide" or "delete" these notification emails.
Back to top of page6. Reporting & Automation
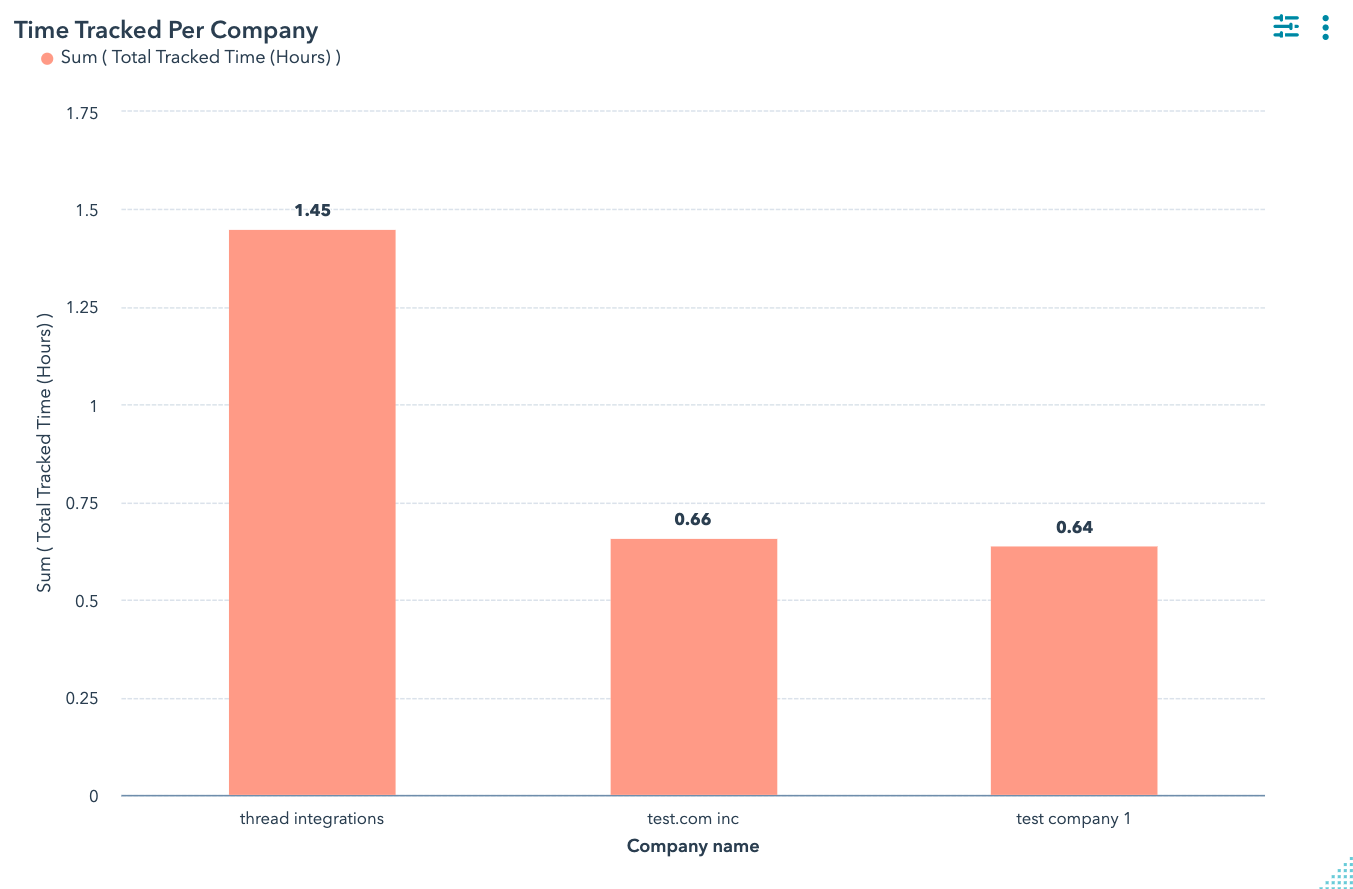
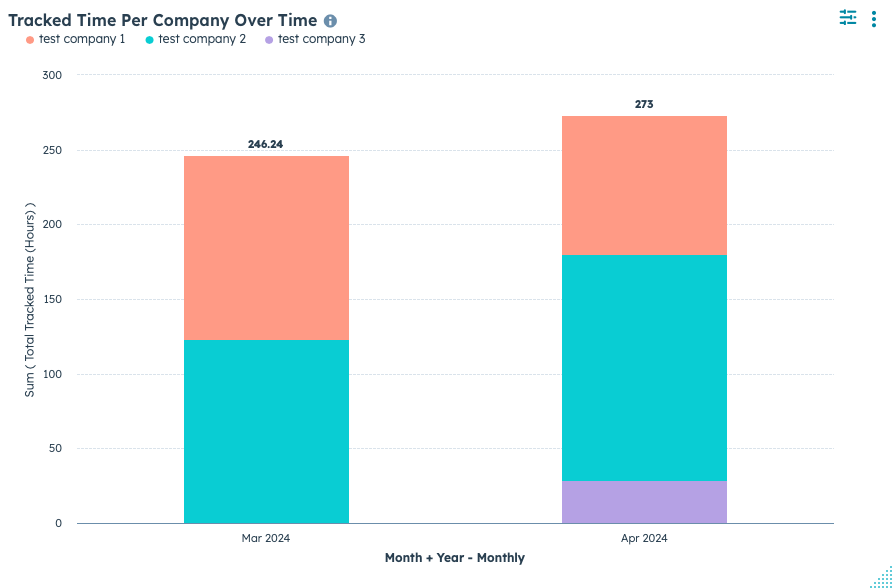
Once you have collected some time tracking data in your HubSpot account (in the format of "Time Log" records), you're likely going to want to extract some value from it.
You can use your Time Logs as you would any other custom object type within your HubSpot account. With your Time Logs as the centrepiece, we recommend creating or updating your existing HubSpot reports/dashboards to better understand how your team is collectively spending their time across Deals, Contact, Companies, Tickets, Appointments, Courses, Listings and/or Services.
To help get the ball rolling, below are a couple of example HubSpot reports leveraging data made available by StopWatch for HubSpot.
To learn how to use your Time Logs in HubSpot's reporting and automation tools, please review HubSpot's official custom object documentation.
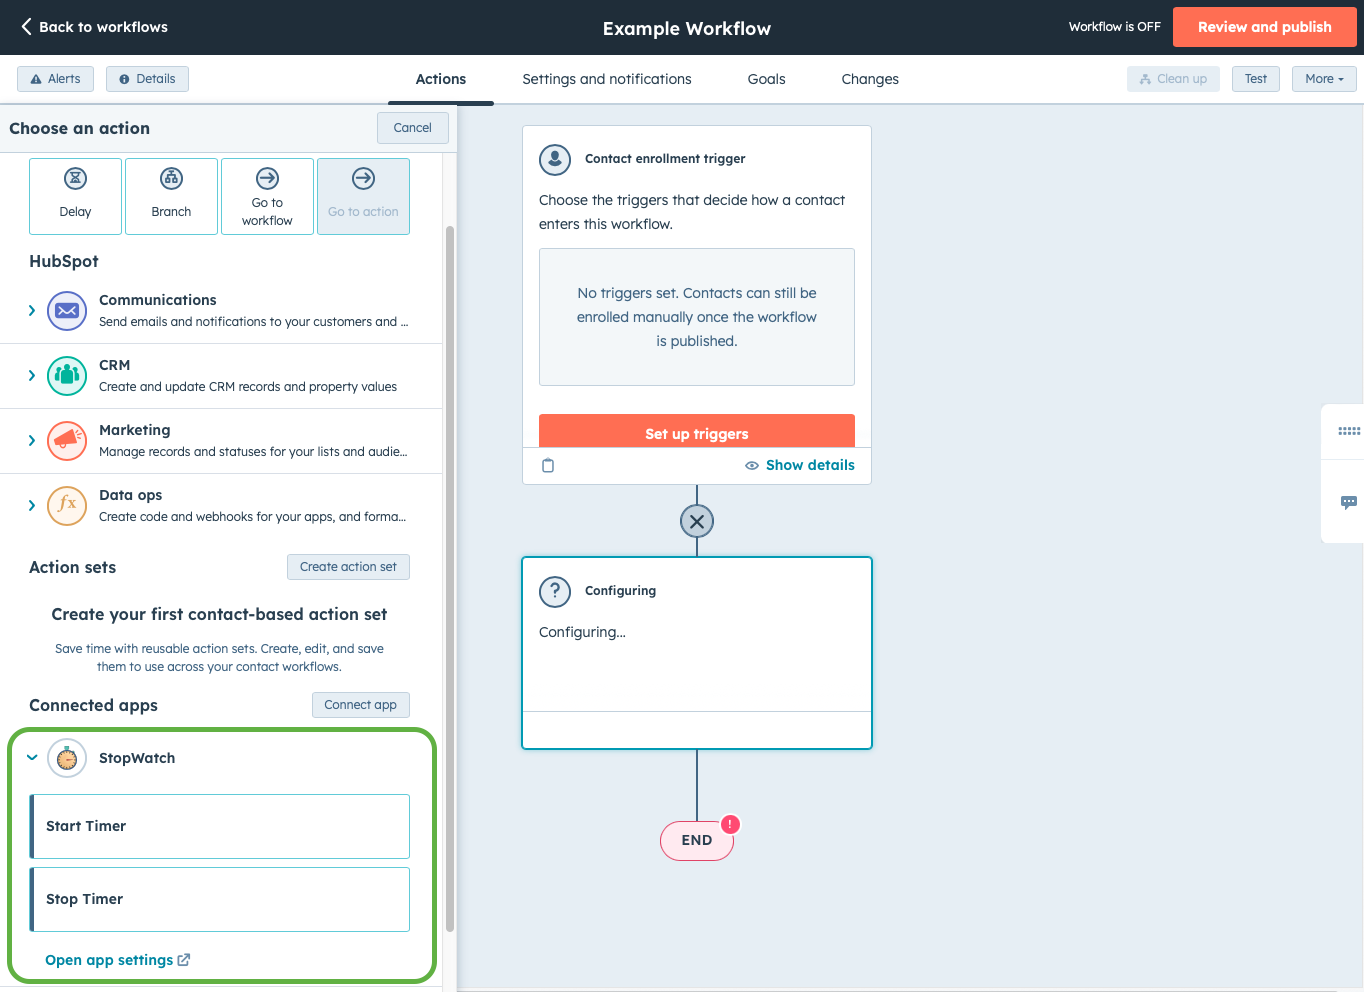
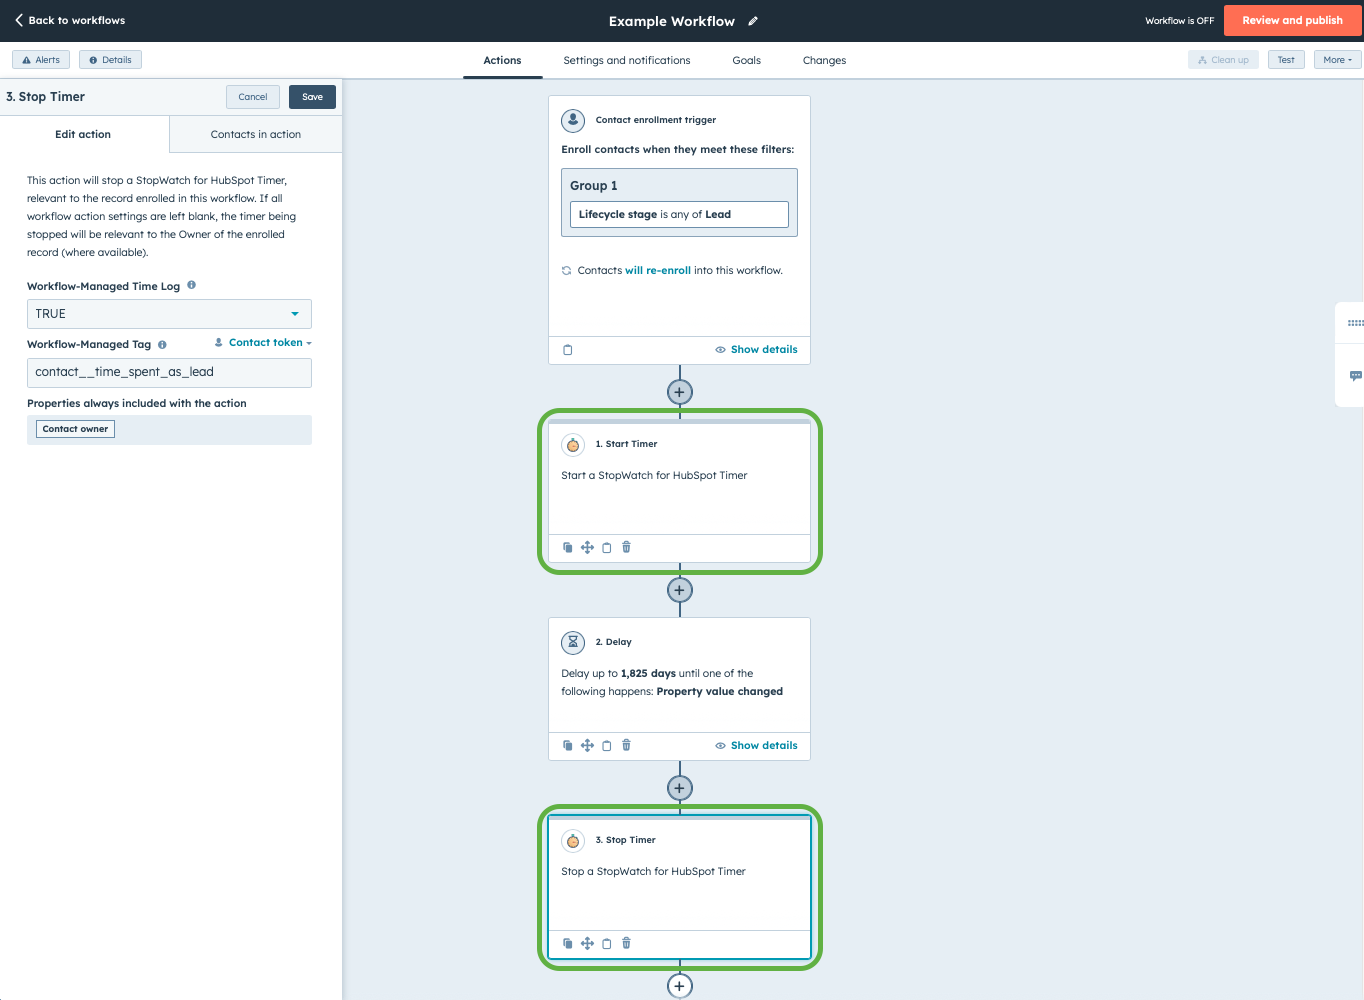
Custom Workflow Actions
StopWatch for HubSpot "💫 Unlimited" subscribers have access to 3 custom workflow actions (see below). There's a daily usage cap of 1,000 custom workflow action requests per day. Any requests made over this usage cap will be rejected by the app. The great majority of requests will be processed within 5 minutes of being received. If you require more requests per day or faster processing times, please submit a support request. Please note, this feature is not available to those using a StopWatch for HubSpot "🤗 Free" or "👥 Team" subscription level.
| Custom Workflow Action Title | Detail |
|---|---|
| 1. Start Timer | This custom workflow action starts a StopWatch for HubSpot Timer, relevant to the record enrolled in the given workflow. |
| 2. Stop Timer | This custom workflow action stops a StopWatch for HubSpot Timer, relevant to the record enrolled in the given workflow. The "Stop Timer" action includes an option to exclude out of office hours, with configurable settings including the ability to specify your timezone and the start/end hours of your standard work day. This allows for the support of common sales and service time tracking use cases involving the analysis of how long CRM records spend in a given stage/status, excluding out of office hours. |
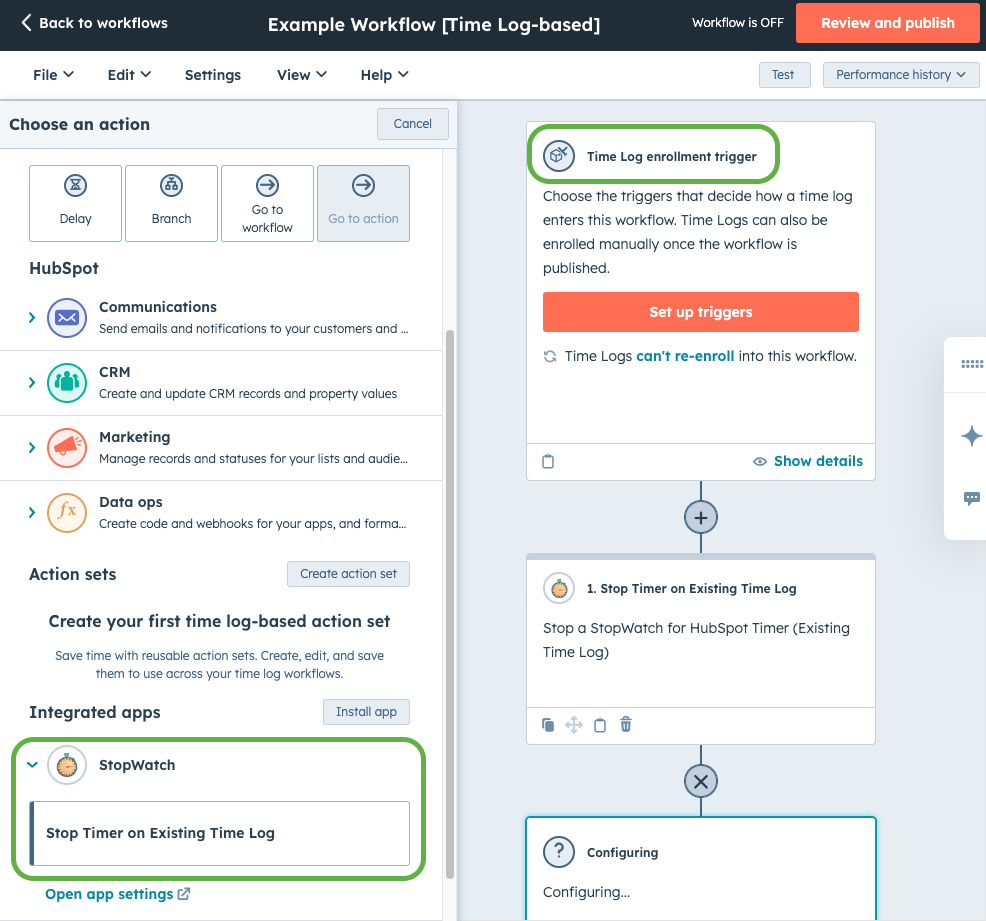
| 3. Stop Timer on Existing Time Log | [Time Log-based Workflows Only] This custom workflow action stops the StopWatch for HubSpot Timer directly on the Time Log enrolled in the given workflow. This feature is made available on a case-by-case basis -- if you'd like access to this feature, please submit a support request. |
These custom workflow actions come with settings that offer far greater time tracking flexibility, in comparison to using the "StopWatch" feature alone. For example, it's possible to configure workflows that track the time an individual record spends within a given object stage (e.g. Deal Stage, Contact Lifecycle Stage, Ticket Status, Listing Stage, Service Stage).
Back to top of page
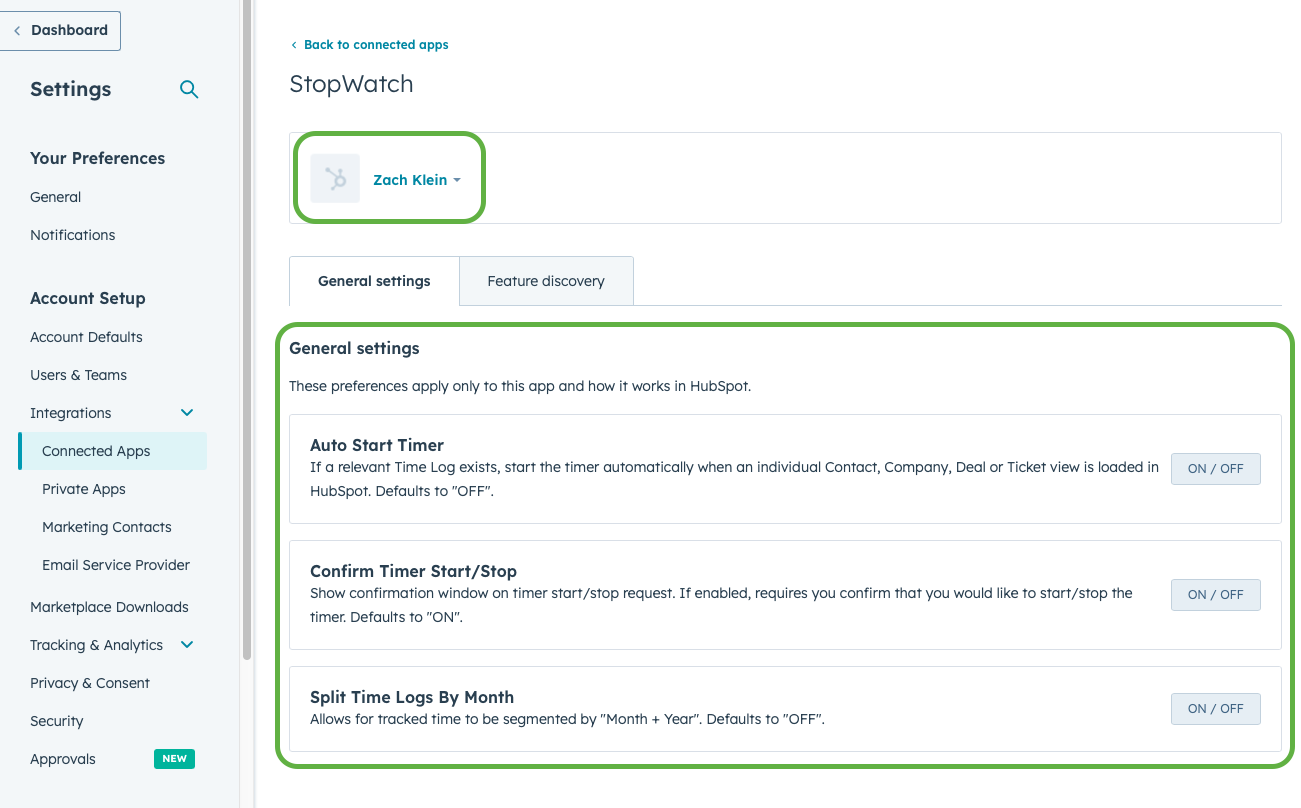
7. App Settings
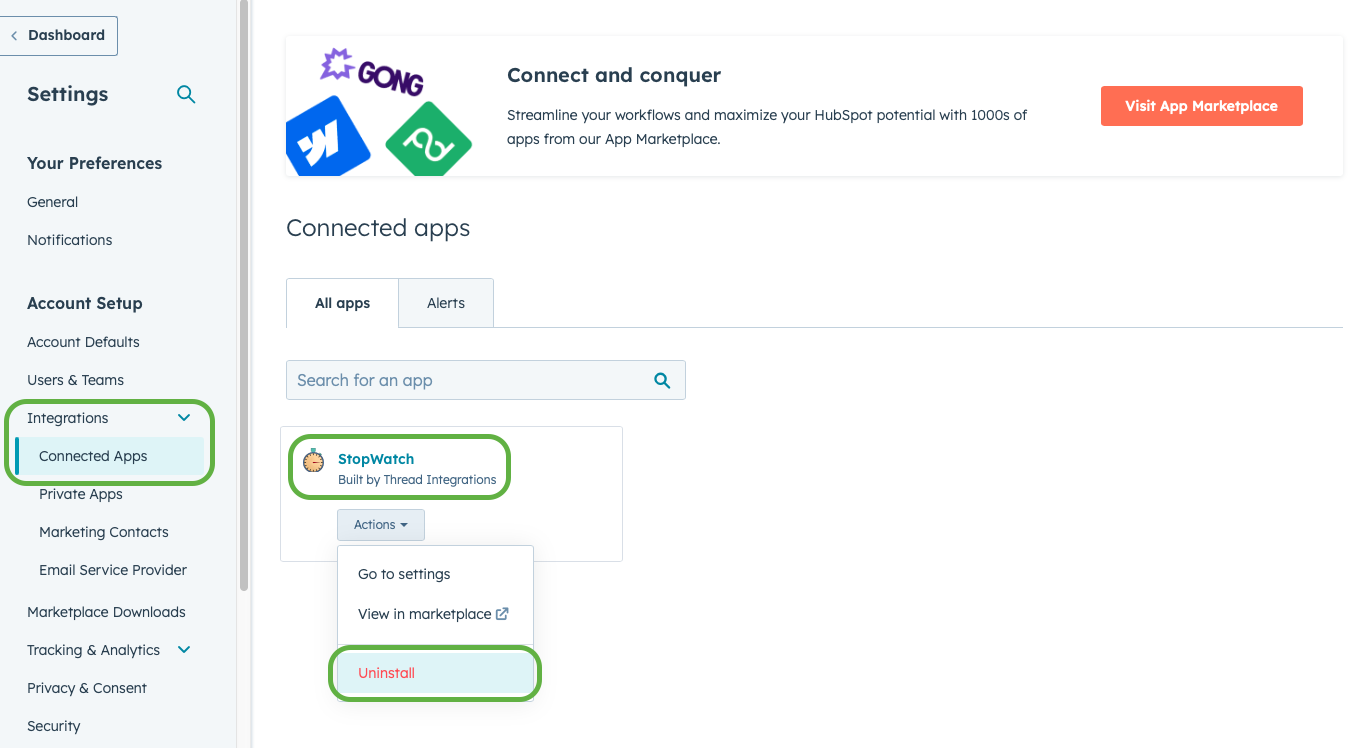
StopWatch for HubSpot comes with user-specific settings which can be configured within HubSpot by any user with "App Marketplace Access" permissions. To access StopWatch for HubSpot settings, navigate to HubSpot Settings > Account Setup > Connected Apps > Click 'Actions' within the 'StopWatch' card > Click 'Go to settings'.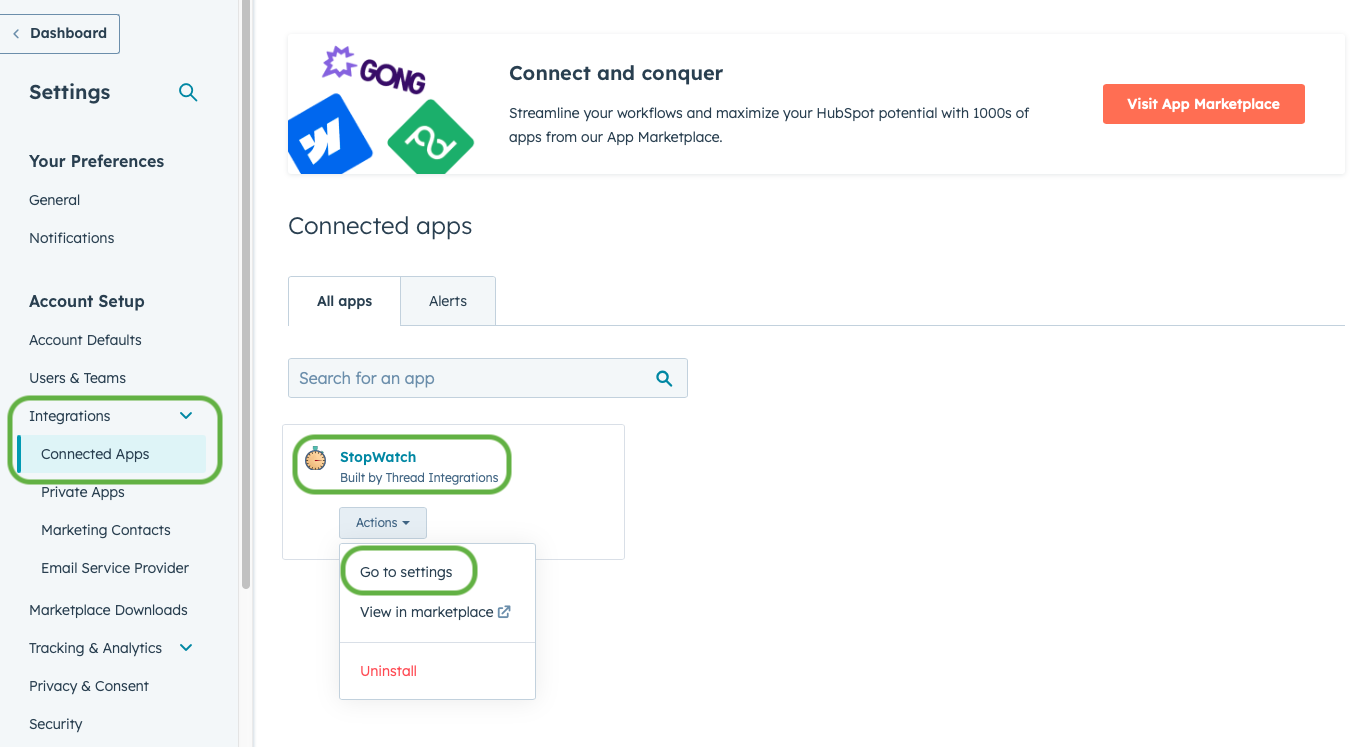
| Setting | Description |
|---|---|
| Auto Start Timer Defaults to OFF |
If enabled, the Auto Start Timer setting starts the timer automatically when you load an individual
Contact, Company, Deal, Ticket, Appointment, Course, Listing or Service view, assuming all of the following
conditions are met:
|
| Split Time Logs By Week Defaults to OFF |
Allows for time tracked via the "StopWatch" and Workflow Action features to be segmented by week of a given year. This is particularly useful for reporting and automation use cases where tracked time needs to be segmented by individual weeks of a given year (e.g. 'Last week'). |
| Split Time Logs By Month Defaults to OFF |
Allows for time tracked via the "StopWatch" and Workflow Action features to be segmented by "Month + Year". This is particularly useful for reporting and automation use cases where tracked time needs to be segmented by month/year combination (e.g. March 2024). |
| Billable Time Option Defaults to OFF |
Allows for time tracked via the "StopWatch" App Card to be segmented into the groups "Billable" and "Total". This is particularly useful for reporting and automating use cases where tracked time needs to be segmented as "Billable", "Total" or "Non-Billable" (i.e. "Total" minus "Billable"). |
| Round Up To Nearest Defaults to Disabled |
Allows for time tracked via the "StopWatch" App Card to be rounded up to the nearest 15, 30 or 60 minute interval. This is particularly useful for billing use cases that require time tracking sessions of a minimum duration. |
| Quick Add Session Increments Defaults to 'Default' |
Configure the duration increments available when submitting a 'Quick Add' time tracking session (in 'Simple' submission mode). This is particularly useful for billing use cases that require 6 minute intervals. |
8. Uninstall App
If you need to uninstall the app from your HubSpot account, this can be performed via HubSpot's "Connected Apps" settings page. Simply navigate to HubSpot Settings > Account Setup > Connected Apps > Click 'Actions' within the 'StopWatch' card > Click 'Uninstall'
Once the app is uninstalled, your HubSpot account will no longer be connected to the StopWatch for HubSpot app. As such, you would no longer be able to use any StopWatch for HubSpot features. However, any existing time tracking data (i.e. Time Log records and associated Time Log Session Details) will remain stored within your HubSpot account for as long as you have access to HubSpot's Custom Objects feature. Additionally, any existing HubSpot Workflows leveraging StopWatch for HubSpot features (e.g. Start Timer and/or Stop Timer actions) will be flagged with a "Changes needed" alert. Please note, any such workflow executions occurring after the app has been uninstalled will result in error.
StopWatch for HubSpot features and associated data are contained entirely within HubSpot. As such, uninstalling the app is the only action required by you to effectively disconnect your HubSpot account from the app. If you have any questions regarding the disconnection of your HubSpot account with the app, please feel free to submit a support request.
Back to top of pageStopWatch for HubSpot is created and managed by Thread Integrations ↗️ , a small Australian business providing expert system integration, software development & analytics services.
© 2025